Tiger Moth Rib Building Workshop
By Jill Oakes and Rick Riewe
The Brandon CATP Museum, Brandon RAA, Winnipeg Area RAA,
and Canadian Aviation Historical Society met at the RAA Workshop Final
Assembly Building March 8th for an evening workshop on building Tiger Moth
Ribs. About 20 people came out on a blustery winter night. Unfortunately
the RCMP closed the Trans Canada Highway due to black ice and blowing snow,
keeping most of the Brandon participants from attending. Harvey McKinnon,
Brandon CATP Museum Pilot, explained that the Museum had three flying airplanes
– Cornel, Stinson and Harvard…and one day the Tiger Moth will be added
to the flying vintage fleet!
This Tiger Moth was built in 1938, last flew about 20
years ago, and has been on static display inside the hangar ever since.
It is now being restored in a joint project with Brandon and Winnipeg area
RAA Members. Tom Phinney and his son have volunteered to be the AMO: Fabric
and Wood for the project, Ted Hector has volunteered to be the AME. Volunteers
working on the project include neighbours, experienced builders, and pilots.
Gerald Ricard, Transport Canada, is providing advice needed to ensure the
paperwork is all brought into order. His colleague, Garnet Fedorowich,
Transport Canada, is familiar with this Tiger Moth, he was working in Brandon
when it first arrived at the museum about 40 years ago and has followed
its repairs and uses with interest. Garnet has been invaluable helping
recover some of this history. Bill Gibson drops in regularly with precious
insights. Bill actually flew this Tiger Moth many years ago and has brought
in invaluable documentations on rigging specifications! Neil Davidson,
a re-known vintage aircraft restorer from BC, has provided a microfiche
filled with rare drawings, which the University of Manitoba is in the process
of copying for the museum. Neil Davidson and the Tiger Boys from Guelph,
generously share their many decades of experience working on Tiger Moths,
and other antiques, from around the world with us as we slowly uncover
questions as the restoration process proceeds.
In preparation for the Tiger Moth rib building workshop,
Gil Bourrier created four jigs, two for aileron ribs and a 2-part jig for
making wing ribs. Gil began by fitting a stiff piece of cardboard over
the spars and wires so he could trace around the entire full-sized rib…with
that classic cambered lower edge that the Pietenpol builders recognized
in their own projects. He mounted this pattern on a sheet of plywood, covered
the pattern with clear plastic, and then strategically positioned spacers
and clamps to guide and hold the cross pieces and cap strips in place.
The clamps were round pieces of wood screwed onto the plywood so they could
be rotated to press the cap strip tightly into position.
Before beginning to build a rib, a collection of vertical
and diagonal braces need to be cut from 1/8” thick spruce. Braces are placed
in about seven positions along the rib. The brace for each position is
a different length and the angle of the cut at the top and bottom is unique…good
idea to cut a whole bunch simultaneously; so all the braces for one station
are identical. Spruce cap strips and gussets are also prepared in advance.
Once all the pieces are prepared, some two-part epoxy
glue is mixed and the braces are glued to the upper and lower strips placed
in the 1st jig. Cap strips are placed in the jig as spacers; cap strips
aren’t glued at this point. Once the glue is set, the partially constructed
full-sized rib is removed and placed in the 2nd of the 2-part jig designed
to hold the cap strips while they are being glued in position. A 2-part
jig was needed because the Tiger Moth rib design has a ‘T’-shaped cap strip
with braces added to both sides of the ‘T’. Participants took a close look
at the jig and actually tried fitting in the pieces to understand why everything
wasn’t just glued at the same time in one jig.
Larry Brown then helped point out some of the highlights
visible in the lower left wing currently being repaired. The all wood structure
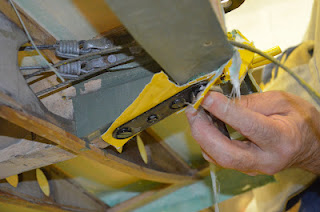
is braced with steel drag and anti-drag wires. The wires are attached to
an adjustable eye with a hand spun coil of steel! This coil is made by
hooking the steel onto a lathe, spinning the lathe a few turns, and then
slipping it over the drag or anti-drag wire! The aileron control rod is
moved with a basic bicycle chain, with a handmade fitting attaching the
chain to the control cables. A bicycle sprocket is connected to the aileron
control rod, just like a pedal on a bicycle! It works extremely well, even
after 70+ years of service!
A few of the ribs on the lower left wing were broken,
splintered, or loose. Over the last month or so, cap strips have been soaked
in steaming water, clamped to a mold and allowed to dry into the original
shape of the rib nose. Once the piece is dry, it is then glued into position,
clamped, and left until dry. This process is repeated, one rib at a time,
and slowly the wing is returning to its original airworthy condition. Straightening
and re-gluing has also been completed on the leading and trailing edges
of the wing and aileron.
Soon both these pieces will be ready for varnish and prepped
for fabric.
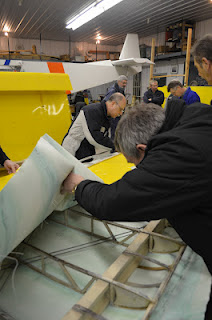
About half way through the evening, we got to see the
lower right wing, fully covered with fabric, just as it was when it was
de-assembled from the fuselage last December. One of the goals for this
event was to remove the covering and begin inspecting this wing for damage
that needed repairing. Welding numerous knives, a marking pen, and camera;
the entire team began removing the fabric. Carefully cutting the hundreds
of stitches, making notes on the fabric, which will be used as a pattern
when we begin recovering the wing, and photographically documenting each
section, slowly the original Tiger Moth wing was uncovered.
The spar attachment fitting was removed. Following British
procedures, the nuts were ‘locked’ onto the bolts by bashing the last thread
to prevent the nut from falling off. To remove the nuts, the last thread
has to be cleaned up with a file and then the nut is easily removed with
a set of British Wentworth socket wrenches lent to us by Vic Préfontaine!
The lower right wing appears to need fewer repairs than
the lower left wing. The paint will be partially removed to check for any
wood rot, hidden fractures, and other abnormalities. With 20 people, it
didn’t take long to get a lot of work accomplished. You are invited to
drop in to help prepare this wing for any repairs and varnish bothy wings
as we get them ready for fabric. March 15th, Thursday, at 7:00 pm in the
RAA Workshop Final Assembly Building at Lyncrest, there will be a mini-fabric
covering workshop…maybe we’ll get to put the fabric on the Tiger Moth aileron
and take one last look at the original data plates, handwritten part numbers,
and other original documentation found beneath the fabric. One day, this
Tiger Moth will be back flying amongst the clouds on a beautiful summer
day over the Brandon airport. Yes, it is a two-person aircraft and the
Museum is planning to allow rides! Contact jill_oakes@umanitoba.ca
if you’d like to volunteer, we’re working most weekends from around 9:30
to Noon with some work done in the afternoon and some weekdays and evenings.
Check out the <tigermothrestoration.blogspot.blog>
or go to the www.RAA.ca website and click
on News to get to our weekly updated with photos and info on this exciting
project.
“Let’s Keep ‘Em Flying”
Photos from the RAA Website


